A radon mitigation system is a set of engineered components that lower indoor radon by creating a pressure differential that pulls radon‑laden soil gas from beneath a foundation and vents it safely above the roofline.
The market offers two basic families – active systems that use a fan and passive systems that rely on natural pressure differences. Each family can be built for a concrete slab foundation or a crawl space, giving four practical configurations.
Installation for an active slab system runs $1,800‑$2,500, while a passive slab design falls between $1,200‑$1,800. Crawl space solutions cost slightly less for passive setups ($1,300‑$1,700) and a bit more for active designs ($1,500‑$2,200).
Call 414‑455‑7279 for a free quote and professional radon testing.
Table of Contents
Why Radon Matters
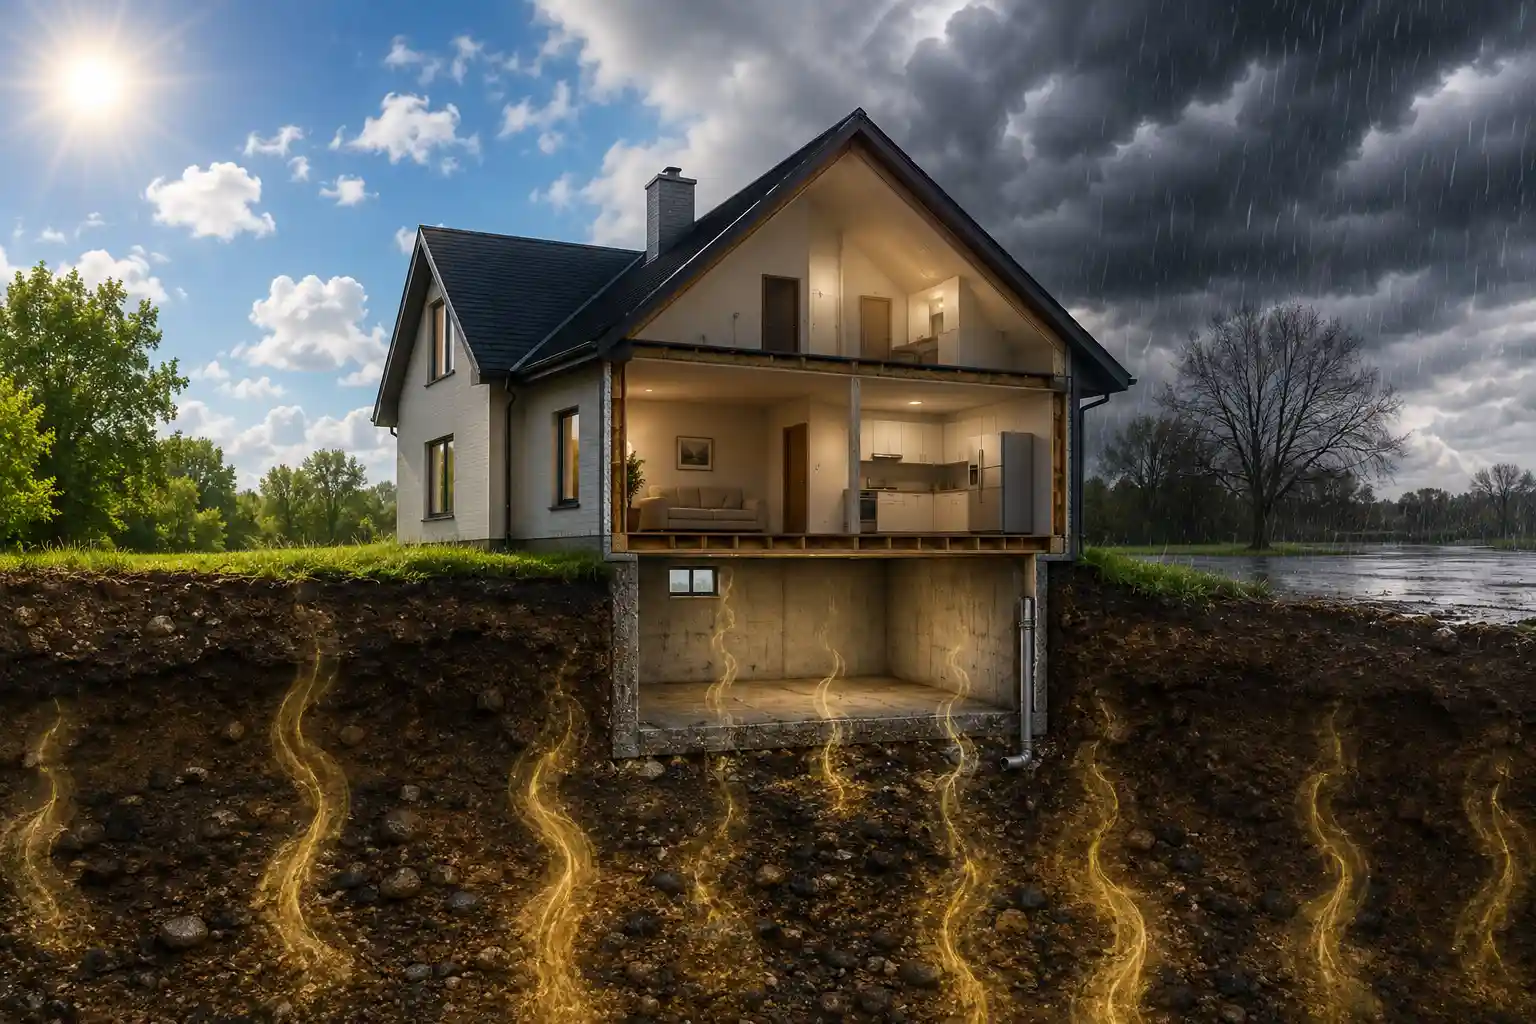
Radon is a colorless, odorless radioactive gas produced by the natural decay of uranium in soil and rock. When it seeps into a home, it mixes with indoor air and can be inhaled. Long‑term exposure at EPA action levels (four hundred becquerels per cubic metre) increases the risk of lung cancer, especially for smokers. Because radon is invisible, only a systematic measurement radon testing can reveal its presence.
Health Impact Snapshot
| Exposure Level (Bq/m³) | Approximate Lifetime Risk (non‑smoker) | Approximate Lifetime Risk (smoker) |
|---|---|---|
| < 200 | 1 in 10,000 | 1 in 1,000 |
| 200‑400 | 1 in 1,000 | 1 in 100 |
| > 400 (EPA action) | 1 in 200 | 1 in 20 |
Numbers are averages from EPA epidemiology studies.
Radon Testing: The Foundation of Any Mitigation Plan
Short Term vs Long Term
- Short term radon testing runs 2‑7 days, is inexpensive, and provides a quick snapshot. Ideal for new home purchases or before a mitigation quote.
- Long term radon testing runs 90 days to one year, capturing seasonal variations. This test is the best proof for insurance claims, real‑estate disclosures, and post‑mitigation verification.
How to Conduct a Test
- Place the detector in the lowest occupied level, at least 20 cm from walls and 50 cm from the floor.
- Seal windows and doors for the duration of the test to simulate normal living conditions.
- Record the start and end dates on the device’s label.
- Send the detector to an accredited lab or use a digital reader if you have a continuous monitor.
Frequency Recommendations
- Test before any mitigation design work.
- Test after installation (1‑week short term and 3‑month long term).
- Perform annual radon testing to verify ongoing performance of the system.
What Is a Radon Mitigation System?
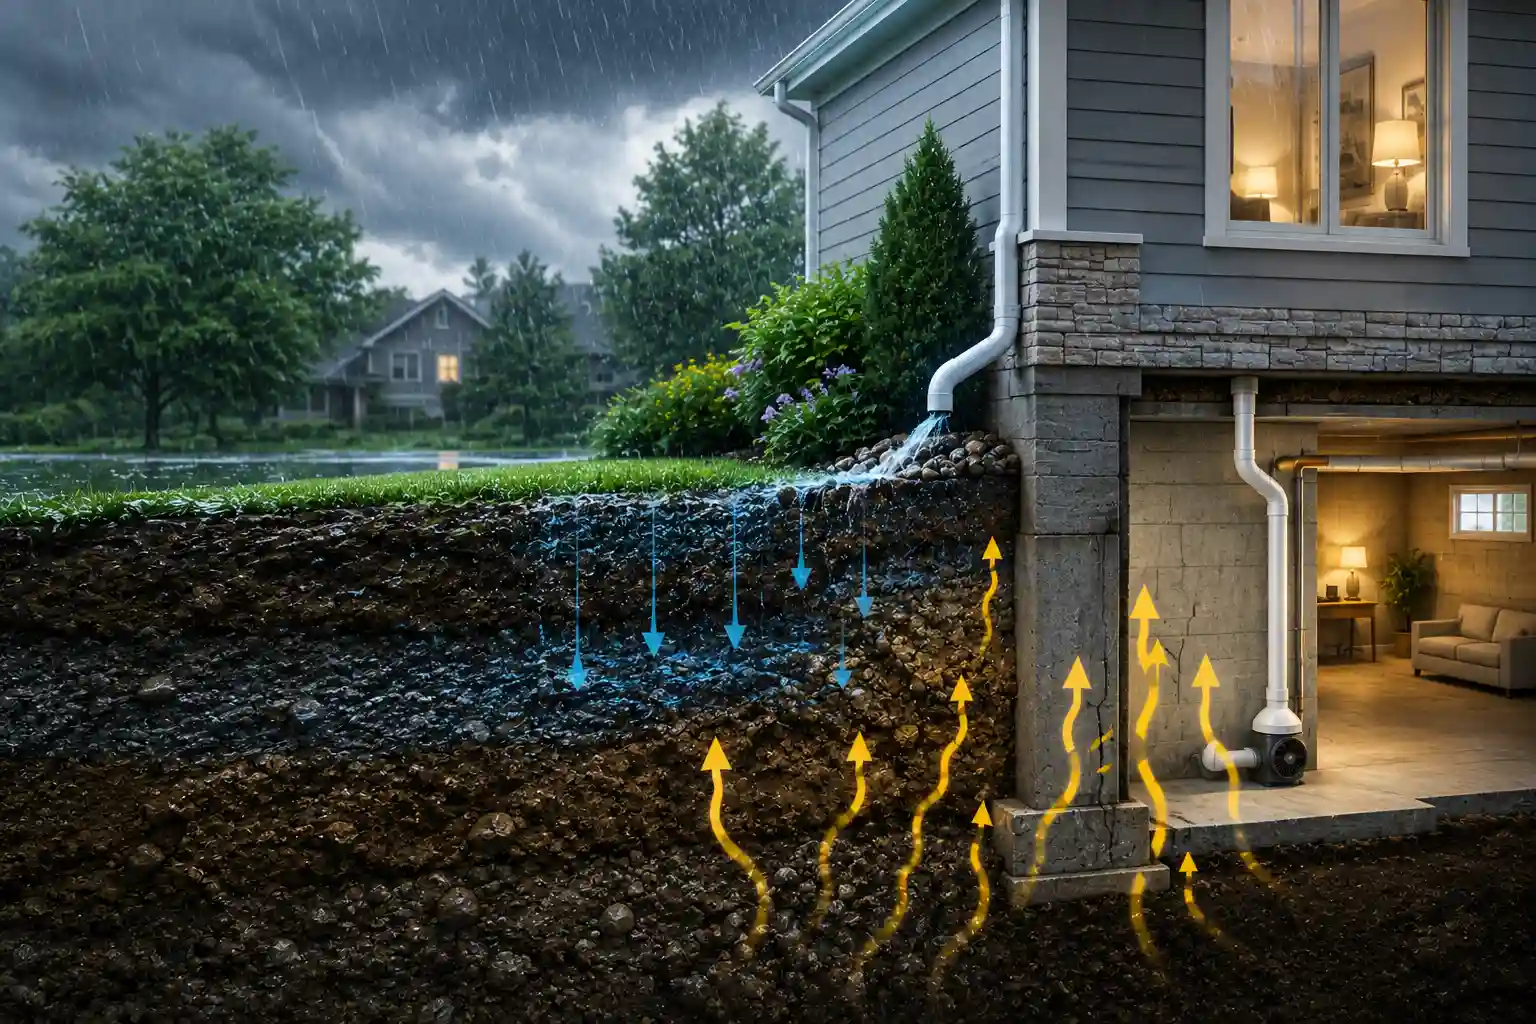
When you ask what is a radon mitigation system, the answer must cover three core ideas: source capture, pressure control, and safe venting.
- Source Capture – A suction pipe is installed beneath the concrete slab or crawl space floor to intercept soil‑borne radon.
- Pressure Control – An active fan or natural draft creates a sub‑slab negative pressure that forces radon into the pipe rather than into the house.
- Safe Venting – The pipe runs vertically and discharges the gas at a point at least three metres above the roof to ensure dilution into the atmosphere.
All effective radon mitigation systems follow this pathway, whether the design is active or passive, slab or crawl space. The system’s success depends on proper sealing of foundation cracks, correct pipe sizing (typically 3‑4 inches diameter), and regular maintenance of moving parts.
How a Radon Mitigation System Works
Physics in Plain Language
Radon moves from high to low pressure zones. By lowering the pressure beneath the slab, the system pulls the gas toward the suction pipe. The fan in an active system maintains a constant pressure differential of 5‑10 pascals, enough to overcome soil resistance and building envelope suction. In a passive system, wind over the vent stack and temperature differences generate a smaller, variable pressure differential, often 1‑3 pascals.
Core Components
| Component | Role | Typical Specs (Active) | Typical Specs (Passive) |
|---|---|---|---|
| Suction pipe | Collects radon from beneath foundation | 10‑15 ft of 4‑in PVC per 100 sq ft floor area | Same pipe, no fan |
| Fan (if active) | Generates negative pressure | 0.5‑1 cubic foot per minute (CFM) per 100 sq ft | N/A |
| Vent stack | Exhausts radon aloft | 10‑15 ft high, metal or PVC, ends above roofline | Same height |
| Sealant | Stops radon entry through cracks & joints | Polyurethane caulk, epoxy | Same |
| Monitoring device (optional) | Verifies system pressure | Inline pressure gauge, digital monitor | N/A |
Types of Radon Mitigation Systems
1. Active Systems
Active Slab System (Concrete Slab)
- Installation – A fan‑mounted suction pipe is placed in a shallow trench beneath the slab, usually between the slab and a perimeter footing.
- Performance – Delivers steady pressure reduction regardless of weather, achieving 70‑90 % reduction in radon levels.
- Ideal For – Older homes with known high radon, regions with cold winters when homes are tightly sealed.
Active Crawl Space System
- Installation – The suction pipe runs beneath the joists, often tucked into the crawl space walls. A low‑profile fan is mounted in the crawl space ceiling or an exterior wall.
- Performance – Provides uniform pressure across the entire crawl space, preventing localized radon buildup under the floor framing.
- Ideal For – Homes built on raised foundations, especially in humid climates where crawl space ventilation is already part of the design.
2. Passive Systems
Passive Slab System
- Installation – Similar pipe layout to an active slab, but no fan is attached. The pipe terminates at a vent stack that relies on wind and temperature differentials.
- Performance – Typical radon reduction of 30‑50 %; effectiveness varies with seasonal wind patterns.
- Ideal For – New construction where the slab is sealed, and the homeowner prefers a zero‑electricity solution.
Passive Crawl Space System
- Installation – Vent pipe runs under the crawl space floor and exits through a vent cap on the exterior wall. Wind over the cap creates a modest draft.
- Performance – Often enough to keep radon below EPA action level in low‑risk areas; may need supplemental sealing.
- Ideal For – Small, well‑ventilated crawl spaces in temperate regions.
Comparison Summary
| System | Power Source | Typical Reduction | Installation Cost | Maintenance |
|---|---|---|---|---|
| Active Slab | Electric fan | 70‑90 % | $1,800‑$2,500 | Annual fan inspection |
| Passive Slab | Natural draft | 30‑50 % | $1,200‑$1,800 | Clear vent annually |
| Active Crawl Space | Electric fan | 75‑95 % | $1,500‑$2,200 | Fan check, pipe seal check |
| Passive Crawl Space | Natural draft | 35‑60 % | $1,300‑$1,700 | Keep vent clear, re‑seal cracks |
Choosing the Right System for Your Property
- Start with radon testing – If short term results exceed 400 Bq/m³, an active system is usually recommended.
- Assess foundation type – Slab homes benefit from sub‑slab piping; crawl space homes need under‑joist routing.
- Consider climate – Cold, sealed homes experience higher indoor radon; active fans offset this. Warm, breezy locations may support passive designs.
- Budget constraints – Passive systems cost less upfront, but may require more frequent re‑testing or supplemental sealing.
- Future plans – If you plan to add basement or renovate the foundation, select a system that can be expanded.
A good rule of thumb: high radon + tight envelope = active, low radon + new sealed building = passive.
Step‑by‑Step Installation Process
Pre‑Installation: Radon Testing & Planning
- Perform a short term radon testing on the lowest level. Record the exact date and time.
- Engage a certified installer; share the test results and any known foundation cracks.
Site Preparation
- Clear the work area; remove any stored items from the basement or crawl space.
- Locate existing utilities to avoid accidental damage.
Pipe Placement
- Slab homes: Drill shallow trenches (6‑8 in deep) around the perimeter and at strategic interior points.
- Crawl space homes: Lay the pipe on the sub‑floor, securing it to the walls with pipe straps.
Sealing
- Apply polyurethane caulk to all visible cracks, joints, and service penetrations.
- Install a vapor barrier (6‑mil polyethylene) over any exposed soil in the crawl space.
Fan Installation (Active Only)
- Mount a CFM‑rated fan on the exterior wall or crawl space ceiling, wiring it to a dedicated circuit.
- Connect the suction pipe to the fan inlet using PVC cement.
Vent Stack Installation
- Use a 10‑15 ft PVC vent that exits at least three metres above the roof.
- Secure the vent with roof flashing and a weather‑proof cap.
System Start‑Up (Active Only)
- Turn on the fan; verify a pressure drop of at least five pascals using an inline gauge.
- Check for leaks by listening for hissing at pipe joints.
Post‑Installation Radon Testing
- Conduct a short term radon testing after one week of continuous operation.
- Follow up with a three‑month long term test to confirm sustained reduction.
Documentation
- Provide the homeowner with a copy of the installation diagram, fan specifications, and a warranty card.
Maintenance & Monitoring
| Task | Frequency | Who Should Perform |
|---|---|---|
| Fan power check (active) | Quarterly | Homeowner or service technician |
| Pipe and vent inspection | Annually | Licensed installer |
| Seal integrity review | Annually | Homeowner (visual) |
| Radon re‑testing | Every 12 months (or after major renovation) | Certified tester |
| Warranty renewal (if applicable) | Every 5 years | Installer |
For active systems, replace a fan that loses more than 10 % of its original airflow. Passive systems need only a clear vent and occasional resealing of new cracks that appear over time.
Cost Overview
Below is a detailed cost breakdown for a typical single‑family home (≈2,200 sq ft). Prices are national averages; local rates may vary.
| Cost Item | Active Slab | Passive Slab | Active Crawl Space | Passive Crawl Space |
|---|---|---|---|---|
| Fan (if active) | $300‑$500 | N/A | $250‑$450 | N/A |
| Suction pipe (PVC, 4 in) | $400‑$600 | $350‑$500 | $350‑$550 | $300‑$450 |
| Vent stack & roof flashing | $150‑$250 | $130‑$220 | $150‑$250 | $130‑$220 |
| Labour (installation) | $600‑$900 | $550‑$800 | $550‑$850 | $500‑$750 |
| Sealing materials (caulk, vapor barrier) | $200‑$300 | $180‑$270 | $180‑$280 | $150‑$250 |
| Radon testing (short + long term) | $150‑$300 | $150‑$300 | $150‑$300 | $150‑$300 |
| Total Estimated Cost | $1,800‑$2,500 | $1,200‑$1,800 | $1,500‑$2,200 | $1,300‑$1,700 |
Additional Financial Considerations
- Tax Credits: The federal Residential Energy Efficient Property Credit may cover up to 30 % of fan and wiring costs (subject to annual limits).
- Financing: Many home improvement lenders offer 0 % APR for 12‑month terms on mitigation projects.
- Insurance Discounts: Some insurers provide a modest premium reduction when a certified mitigation system is installed and documented.
Common Mistakes and How to Avoid Them
- Skipping the post‑installation radon test – Without verification you can’t be sure the system works; always schedule a short term and a long term test.
- Using an undersized fan – A fan that provides too little CFM will not maintain the required pressure drop; consult the installer’s sizing chart.
- Neglecting foundation sealing – Even the best fan can’t compensate for large unsealed cracks; seal all visible gaps before pipe installation.
- Placing the vent stack too low – Exhaust must be at least three metres above the roof to ensure safe dispersion; otherwise radon can re‑enter.
- Forgetting annual maintenance – Fans can lose efficiency; regular checks keep the system performing at design levels.
DIY vs Professional Installation
| Aspect | DIY Approach | Professional Approach |
|---|---|---|
| Cost | Lower upfront (no labour) | Higher upfront, includes warranty |
| Quality Assurance | Variable, depends on skill | Certified verification, meets code |
| Warranty | Usually none | 5‑year fan warranty, 10‑year workmanship |
| Insurance Acceptance | May be rejected | Generally accepted for claims |
| Regulatory Compliance | May miss local permits | Permits handled, paperwork filed |
| Long‑term Reliability | Risk of premature failure | Ongoing support, service contracts |
Bottom line: For peace of mind, a certified professional is usually the smarter investment, especially when you need to document the work for resale or insurance purposes.
Regulatory Landscape
- EPA Guidelines: Recommend action at 400 Bq/m³ and require radon disclosure during real estate transactions.
- State Requirements: More than 30 states have radon reduction laws that dictate specific testing intervals, mitigation standards, and required documentation.
- Building Codes: New home construction in many jurisdictions must include a radon barrier under slabs or a vent stack for crawl spaces.
- USDA Loans: Federal home loans often require radon testing if the property is located in a high‑risk zone.
Staying current on local regulations ensures your radon mitigation system remains compliant and protects you from potential fines.
Future of Radon Mitigation
Technological advances are reshaping the field:
- Smart Fans: Wi‑Fi enabled fans can auto‑adjust speed based on real‑time pressure sensor data, increasing efficiency while lowering electricity use.
- Continuous Radon Monitors: Battery‑powered devices provide live radon level alerts to smartphones, prompting immediate action if a system fails.
- AI‑Driven Predictive Maintenance: Algorithms analyze fan performance trends to predict when a replacement is needed, preventing unexpected downtime.
- Hybrid Systems: Combining a low‑energy fan with a passive vent stack can deliver high reduction rates while using a fraction of the electricity of a full‑power fan.
Investing in a system that supports upgrades (e.g., wiring for a smart fan) can future‑proof your home.
Frequently Asked Questions
What is a radon mitigation system?
A radon mitigation system is a network of sealed pipes, a fan (in active designs), and a vent stack that pulls radon from beneath a foundation and releases it safely above the roof.
How does a radon mitigation system work?
The system creates a pressure difference that forces soil gas into a suction pipe, then uses a fan (active) or natural draft (passive) to move the gas up a vent where it disperses into the atmosphere, keeping indoor concentrations low.
Do I need a radon mitigation system if my radon test is below 400 Bq/m³?
While the EPA recommends action only above 400 Bq/m³, many homeowners install a system as a preventative measure, especially in high‑risk regions or before a home sale.
Are active radon mitigation systems more expensive than passive ones?
Yes. Active designs include a fan and electrical wiring, typically adding $300‑$500 to the overall cost, but they guarantee 70‑90 % radon reduction regardless of weather.
How long does a radon mitigation system last?
With proper maintenance, an active fan can operate 10‑15 years before efficiency drops. Passive systems have no moving parts, so they can last indefinitely if the vent remains clear.
Conclusion
Understanding what is a radon mitigation system is the first step toward a safer indoor environment. Whether you choose an active fan‑driven design or a passive natural‑draft solution, the key is to start with accurate radon testing, select the configuration that matches your foundation type, and commit to regular maintenance. With proper installation, most homes achieve a 70‑90 % radon reduction, bringing indoor levels well under the EPA threshold.