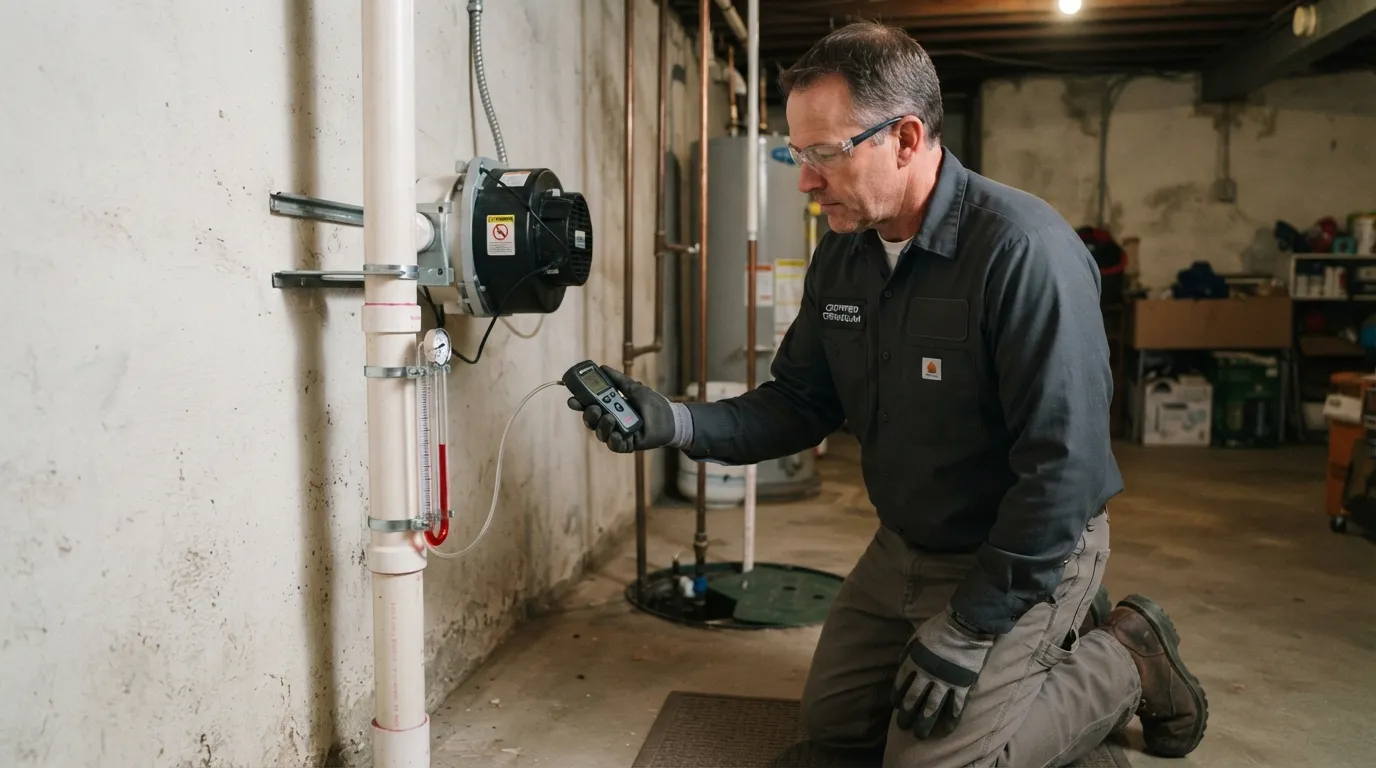

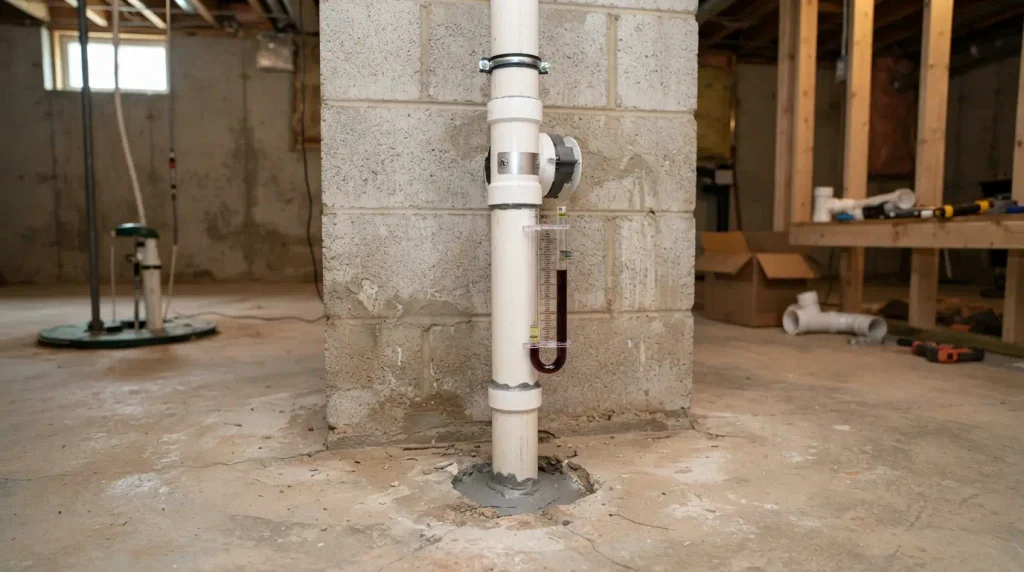
What does a radon mitigation system look like? In most Milwaukee homes, it’s a single white PVC pipe, 3 or 4 inches wide, rising out of the basement floor or a sealed sump lid, with a small U-shaped gauge mounted on it. That pipe connects to a fan in the attic, the garage, or on an outside wall, and it vents above the roofline.
That’s the whole system in a typical basement home. Below, we walk through each part up close, explain where each one is allowed to go, and help you figure out whether the house you own, or want to buy, already has one.
Table of Contents
The Parts of a Radon Mitigation System at a Glance
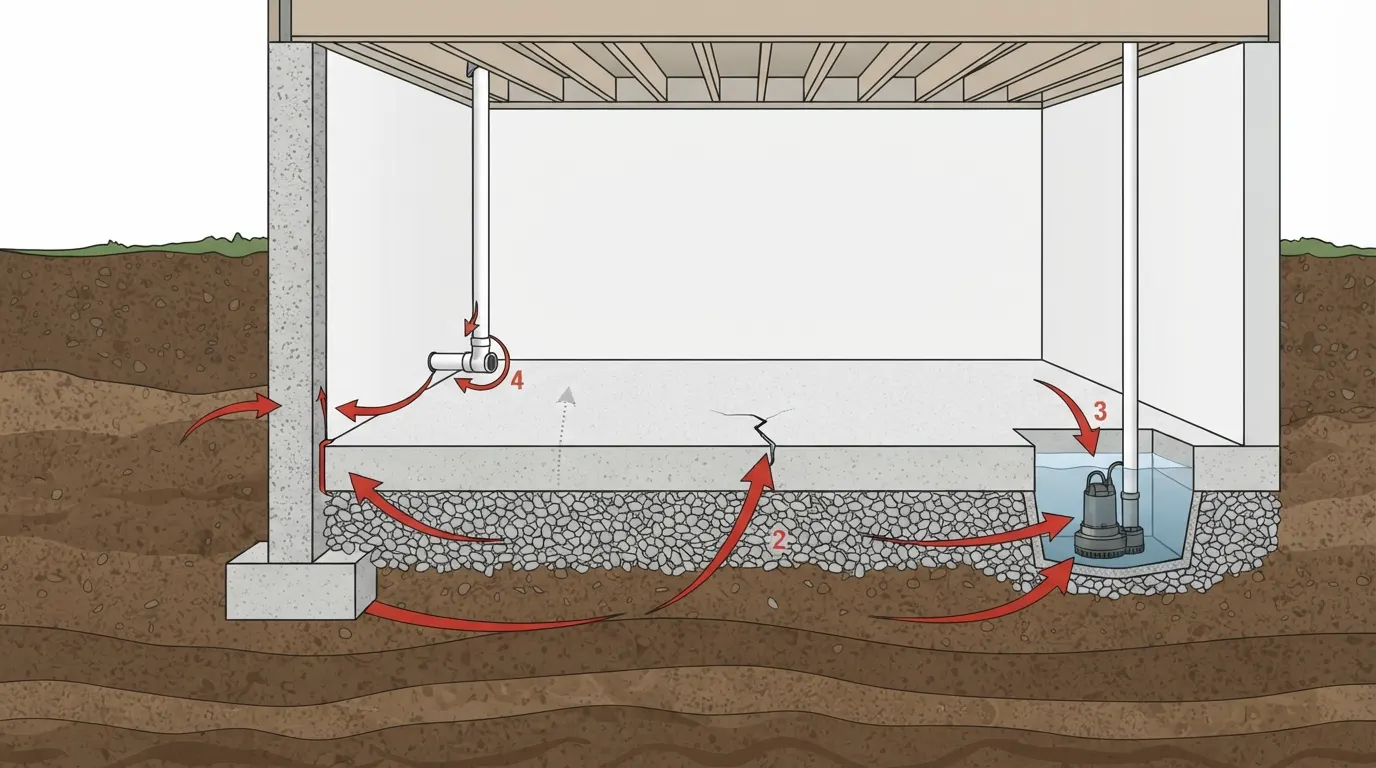
Most homes in our area use sub-slab depressurization. In plain terms, a fan pulls soil gas out from under the basement floor before it can seep inside. Here’s what each piece looks like and where you’ll usually find it.
| Part | What you’ll see | Where it usually is |
| Suction point | A pipe entering a cored hole in the concrete floor, sealed around the edge | Basement floor, often in a utility room, a corner, or next to the sump |
| Sealed sump lid (if used) | A flat, airtight cover with the pipe passing through it | Over the sump pit |
| Vent pipe | White or gray PVC, 3 or 4 inches across | Up a basement wall, through a closet or garage, or up an outside wall |
| U-tube manometer | A small clear U-shaped tube with colored liquid | Mounted on the pipe at eye level, usually in the basement |
| System labels | Stickers reading “Radon Reduction System” or similar | On the pipe, on each floor where it’s visible |
| Radon fan | A round, drum-shaped housing spliced into the pipe, with wiring nearby | Attic, a garage with no living space above, or an exterior wall |
| Exhaust point | The open top of the pipe, sometimes with a mesh screen | Above the edge of the roof |
| Sealed cracks | Thin lines of caulk along cracks and floor-to-wall joints | Basement floor and lower walls |
The gauge isn’t decoration. The EPA’s consumer guide says every active system needs a warning device that shows when the system stops working, placed where you’ll notice it. The fan is the part doing the heavy lifting, and our guide to how a radon fan works in a mitigation system covers it in more detail.
What Does a Radon Mitigation System Look Like Inside?
Inside the house, you’ll usually see only the bottom half of the system: a pipe coming out of the basement floor, a gauge, and a label or two.
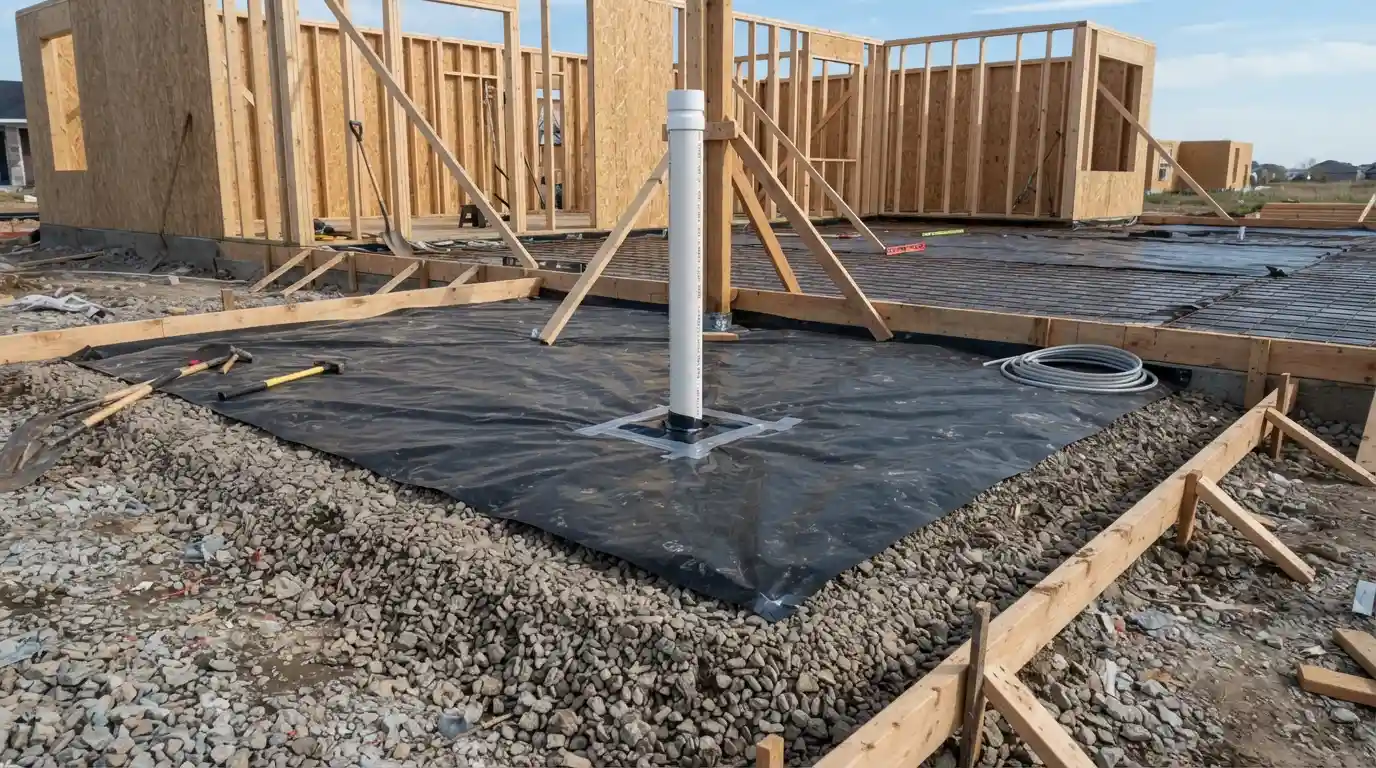
The pipe starts at a hole cored through the concrete slab. Installers typically dig out a small pocket of soil or gravel below that hole so the fan has open space to pull from. What you see is the pipe dropping straight into the floor, with the gap around it sealed.
In homes with a sump pit, the pipe may run through a sealed sump lid instead. A good install still lets you pop that lid off to service the pump.
From the floor, the radon pipe in the basement usually climbs straight up a wall in an unfinished corner, laundry area, or storage room. It may run along the ceiling joists for a short stretch before it leaves the basement.
The U-tube manometer is the piece most homeowners notice first. When the fan is pulling, the colored liquid sits higher on one side of the U than the other. If both sides are even, the fan probably isn’t running.
If the pipe routes through an attached garage, you’ll see it climb the garage wall to a fan near the ceiling, or pass into the attic above. That only works when the garage has no bedroom or other living space over it.
What It Looks Like Outside the House
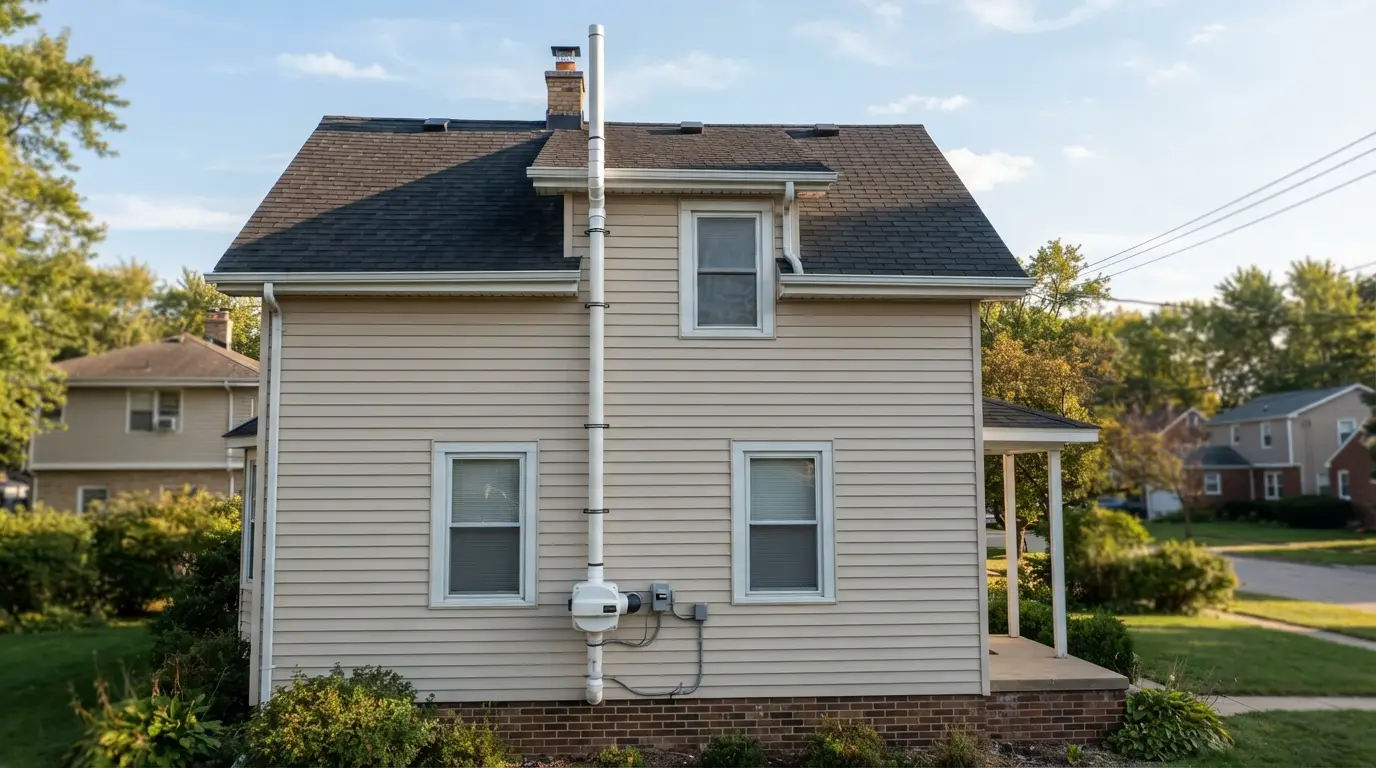
From the street, an exterior system looks a lot like a second downspout: a pipe running up the side of the house and ending just above the roof edge.
The pipe usually exits the basement through the rim joist, the wood band that sits on top of the foundation wall. Just outside, you’ll see the fan, a round housing spliced into the pipe, with an electrical disconnect close by. Above the fan, the radon mitigation outside pipe climbs the wall and ends past the eave.
When the pipe runs up through the house instead, the only outside sign is a vent stack poking through the roof, similar to a plumbing vent. Most people never notice it.
Milwaukee winters matter here. Soil gas carries moisture, and inside a cold exterior pipe that moisture can condense and freeze. The AARST standard for existing homes tells installers to design exhausts that limit ice blockage, and it requires exterior fans to be rated for outdoor use or housed in a weatherproof enclosure. That’s one reason many installers route through an attic or garage when the floor plan allows it.
Interior vs. Exterior Routing
The route the pipe takes changes how the system looks more than anything else. Here’s how the two options compare.
| Interior route (closet, chase, garage, attic) | Exterior route (up an outside wall) | |
| What you see | Pipe in the basement, plus a vent stack on the roof | Pipe and fan on the siding |
| Curb appeal | Mostly hidden from outside | Visible from at least one side of the house |
| Winter icing | Pipe stays in warmer space | More exposed to condensation freezing |
| Fan access | Needs attic or garage access for service | Easy to reach from the ground or a short ladder |
| Installation work | More carpentry and sealing where the pipe passes through floors | Less work inside the house |
| Best fit | Homes with a closet stack, attached garage, or reachable attic | Finished homes where an inside route would mean opening walls |
Neither route is automatically better. The right one depends on your floor plan, where the suction point has to be, and what you’re comfortable seeing every day. That’s a decision for the site visit, not a default.
What Size and Type of Pipe Is Used for Radon Mitigation?
Most home radon systems use 3-inch or 4-inch PVC pipe. The AARST mitigation standard treats 3 to 4 inch pipe as the baseline size when it sets exhaust clearances, and it requires bigger clearances for anything larger.
Schedule 40 PVC is the standard choice for residential radon mitigation pipe, and some systems use ABS. Any pipe exposed outdoors or in a garage has to stand up to weather and the occasional bump from a bike or car door.
Whether a home gets 3-inch or 4-inch pipe comes down to a few factors:
- Fan capacity. AARST requires the fan to be sized for the pressure and airflow the job needs, and the pipe has to match.
- Pipe length and bends. Every elbow and extra foot adds resistance.
- What’s under the slab. Loose gravel lets air move easily; tight clay or bare soil doesn’t.
- Number of suction points. Two or more points feeding one pipe move more air.
The pipe also has to slope so condensation drains back under the slab instead of pooling in a low spot or at the fan.
Where is a Radon Mitigation System Installed?
Each part has its own placement rules, and nearly all of them exist to keep radon from leaking back inside.
The suction point
Installers look for the spot under the slab where one pipe can pull from the widest area. Many drill a few small test holes and measure how far suction reaches before choosing. Utility rooms, unfinished corners, and sump pits are common picks because they stay out of the way. Our walkthrough of how a radon mitigation system is installed in Milwaukee covers that visit step by step.
The fan
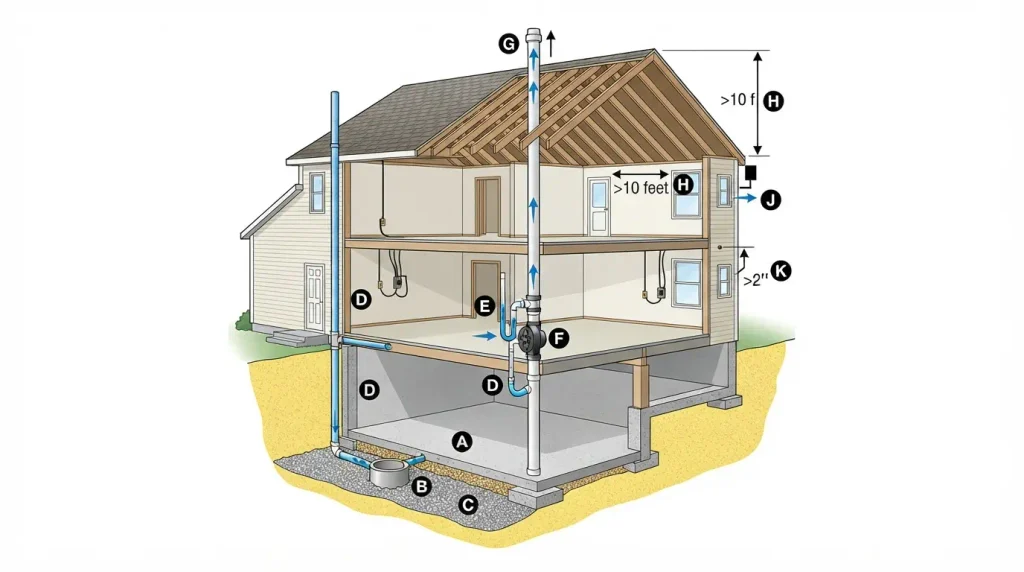
Under the AARST standard, a radon fan can’t go in conditioned living space or directly beneath it, which rules out basements and crawl spaces. Approved spots are attics, the outside of the house, and garages that don’t sit under living space. The EPA gives the same guidance: the fan belongs in unconditioned space, never in or below a livable area.
The reason is simple. The pipe above the fan is under positive pressure. If a joint in that section ever cracked, you’d want the leak outdoors or in the attic, not in your family room.
The exhaust
The EPA’s consumer guide says the exhaust from a soil suction system has to:
- Vent above the surface of the roof
- End at least 10 feet above the ground
- Sit at least 10 feet from windows, doors, and other openings, unless it ends at least 2 feet above them
A radon pipe that ends low on a side wall, especially near a window, deck, or patio, is a common red flag worth asking about. For the bigger picture on why these rules shape system design, see our guide to how a radon mitigation system works and why it matters.
How to Tell If Your Home Has a Radon Mitigation System
Start in the basement and work your way up. In most homes, you’ll have an answer in a few minutes.
- Check the basement floor and sump. Look for a 3 or 4 inch pipe going straight into the concrete or through a sealed sump cover.
- Look for the gauge. A U-tube manometer on the pipe is the clearest sign of an active system.
- Read the labels. The EPA says radon systems must be clearly labeled so no one mistakes the pipe for plumbing. EPA’s model standards give the wording as “Radon Reduction System.”
- Find the fan. Check the attic, the garage ceiling, and the outside walls for a round fan housing in the pipe, with wiring or a switch nearby.
- Look up at the roof. A vent stack that doesn’t line up with a bathroom or kitchen below may be the radon exhaust.
- Ask for paperwork. Past test results, an installer’s sticker on the pipe, or the seller’s disclosures often name the system and when it went in.
A pipe but no fan? It may be a passive system
Newer homes built with radon-resistant features sometimes have a passive pipe: the same labeled pipe from the slab to the roof, but no fan. It relies on natural airflow. Wisconsin DHS notes that when piping is already in place, a contractor can often add a fan to make the system active. Our comparison of passive vs. active radon-resistant construction explains the difference.
Found a system? Don’t assume it’s working. A fan can fail quietly, and only a test confirms your levels. Our radon testing service uses calibrated continuous monitors, and if you’re house hunting, our article on buying a house with a radon mitigation system covers what to check before closing.
Can You Finish a Basement With a Radon Mitigation System?
Yes. Plenty of homes have a radon system and a finished basement. The trick is planning around the pipe instead of burying it.
- Box the pipe into a soffit, closet, or chase, but leave the manometer where you can see it. It’s your only everyday check that the fan is running.
- Keep an access panel anywhere a contractor may need to reach later, such as the sump lid connection.
- Seal slab cracks and wall joints before drywall goes up. Wisconsin DHS points out that a fan-powered system can pull conditioned air through cracks behind finished walls, which wastes heat and weakens suction.
- Don’t move the fan into the basement to hide it. That breaks the AARST rule on fan location.
- Retest when the project is done. New walls, a bathroom, or HVAC changes can shift how air moves through the house.
Finishing a basement in a house without a system? Test first. Running pipe before the walls go up is far easier than opening them later.
How to Hide a Radon Mitigation System Without Breaking It
You can make a radon system much less noticeable. You just can’t hide the parts that tell you it’s working, or move the parts that keep radon outside.
Options that work:
- Route through the interior. A closet stack or attached-garage run can take the pipe off your siding completely.
- Pick a less visible wall. An exterior run on a side or back wall can work, as long as the suction point and exhaust rules still line up.
- Paint exterior pipe to match the siding. Ask your installer which paint suits the pipe material, and keep the labels readable.
- Use a fan enclosure made for exterior radon fans, as long as it keeps airflow and service access.
- Trim out interior pipe with drywall or wood casing, leaving the gauge visible.
Things to avoid:
- Cutting the exhaust down below the roof edge
- Covering the manometer or peeling off the labels
- Boxing in the fan so tightly that no one can reach it
Moving an existing system is real work that changes how it pulls. If you want a pipe rerouted, have a certified installer do it and retest afterward. Our radon system repair and fan replacement service handles reroutes and fixes on systems other companies installed.
What a Quality Install Looks Like in Wisconsin
Wisconsin doesn’t license radon contractors, so the look of the finished job is a fair clue to its quality. Wisconsin DHS recommends hiring a contractor certified by the National Radon Proficiency Program or the National Radon Safety Board, and it notes that sealing cracks alone hasn’t been shown to cut radon by much.
That matters locally. About 1 in 10 Wisconsin homes has elevated radon, according to Wisconsin DHS, so a lot of houses around Milwaukee end up with one of these systems. Signs of a careful installation:
- Straight, well-supported pipe runs with every joint glued
- Labels on the pipe at each floor level
- A manometer mounted where you’ll actually see it
- A fan outside the living space, in the attic, garage, or on the exterior
- An exhaust above the roof edge, clear of windows and doors
- A sealed suction point and an airtight sump lid
- A post-installation radon test with the results in writing
If your system is missing several of these, a radon system inspection can tell you whether it needs a fix or just a checkup.
FAQ
Why is there water or gurgling in my radon pipe?
Soil gas is damp, and that moisture condenses inside the pipe, especially in cold weather. A properly sloped pipe drains the water back under the slab, which can sound like a gurgle. Constant loud gurgling, water collecting at the fan, or ice building at the exhaust is worth an inspection.
Should a radon exhaust pipe have a rain cap?
Usually not. The AARST standard treats caps as optional for places with heavy debris or driving rain, and it recommends wire mesh with openings no smaller than 1/2 inch to keep out animals. Whatever sits on the pipe end shouldn’t noticeably choke airflow.
Can a radon pipe be moved after it’s installed?
Yes. A certified installer can reroute the pipe or relocate the fan, as long as the new layout still meets fan and exhaust placement rules. Rerouting changes how the system pulls, so retest your radon level afterward.
Is a radon pipe in the basement a red flag when buying a house?
Not by itself. It usually means a past owner tested and fixed a problem. Ask for the post-mitigation test, check that the manometer shows suction, and include a radon test in your inspection. Our guide to buying a house with a radon mitigation system goes deeper.
Does a radon mitigation system make noise?
The fan runs around the clock, so a low hum near the fan is normal, and you may hear airflow at the exhaust. A new rattle, whine, or grinding sound can point to a failing fan or a loose mount. See why a radon fan gets loud for common causes.
What should the manometer on a radon system read?
There’s no single correct number. Every system has its own normal reading, which depends on the soil and the fan. Your installer should mark the startup level on the gauge or in your paperwork. If the liquid evens out or drifts well away from that mark, call for a check.
What does a radon system look like in a crawl space home?
In a crawl space, the installer usually covers the dirt floor with heavy plastic sheeting sealed to the walls, then runs a pipe from under that sheeting to a fan and roof exhaust. It’s called sub-membrane depressurization. Our guide to the types of radon mitigation systems compares it with basement setups.
Conclusion
A radon mitigation system is mostly a pipe, a fan, and a gauge. What makes it work is where those parts go: suction under the slab, a fan outside your living space, and an exhaust high enough that the gas can’t drift back in.
If you’re weighing a system, or you just found a mystery pipe in your basement, start with our guide to how a radon mitigation system works. When you’re ready, Milwaukee Radon Mitigation designs and installs systems across Milwaukee, Waukesha, and Ozaukee counties. Request a free quote or call (414) 455-7279 to learn more about our radon mitigation service.